Using Azure AD to Secure an Episerver Website
It's no secret that security is vital for different areas of an Episerver website, especially the editing and admin interfaces. If you use Azure Active Directory to login to organization infrastructure already, why not use it to secure your website? Optionally, you can use Azure AD to shield non-production environments from public view entirely, allowing you to develop new features and content without the public's eye on them.
How To Secure an Episerver With Azure Active Directory
We'll be taking a look at a few different purposes for Azure AD authentication on an Episerver website which are:
$1
$1
$1
Controlling Visibility
There are a number of reasons to secure the visibility of an entire application. Some common examples are:
$1
$1
$1
Securing Episerver UI
You'll want to control access to your episerver content editing and administration via AD. You can get very specific with roles and access rights, or you can just give everyone in your directory access to edit mode.
How to Setup Azure Active Directory With Episerver
So, we need to connect the authentication process for the website to Azure AD. Here's the high level process:
$1
$1
$1
$1
Creating an Azure AD Application
To start off, we assume that you already have an Azure Active Directory and permissions to add applications. So let's login to https://portal.azure.com and Select "Azure Active Directory" either in the left panel of favorites or via "All Services" search.
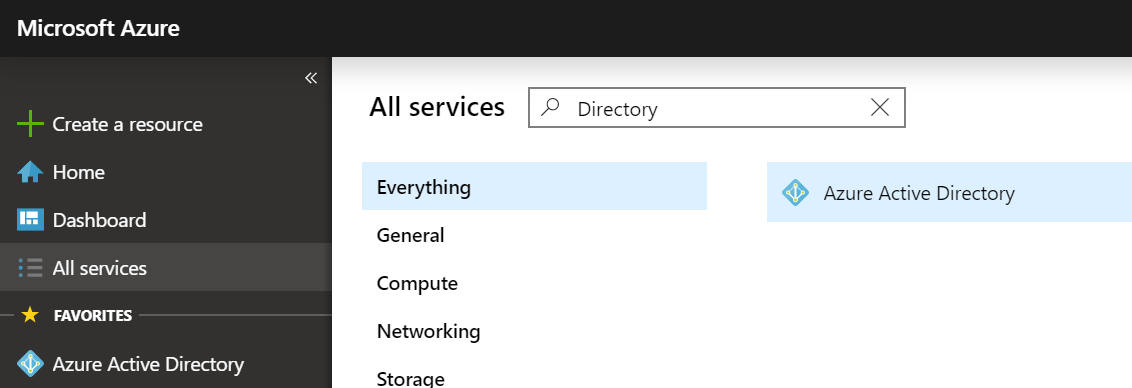
You should see a screen similar to this, with "App Registrations" down a few options on the left side.
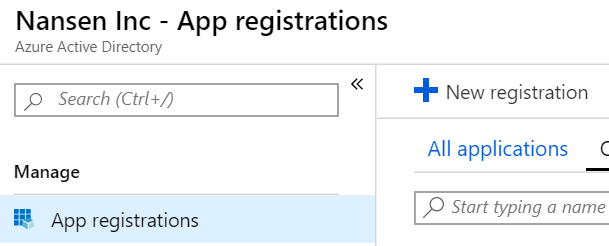
Click into that, and create a new app registration that represents your website's connection with your directory.
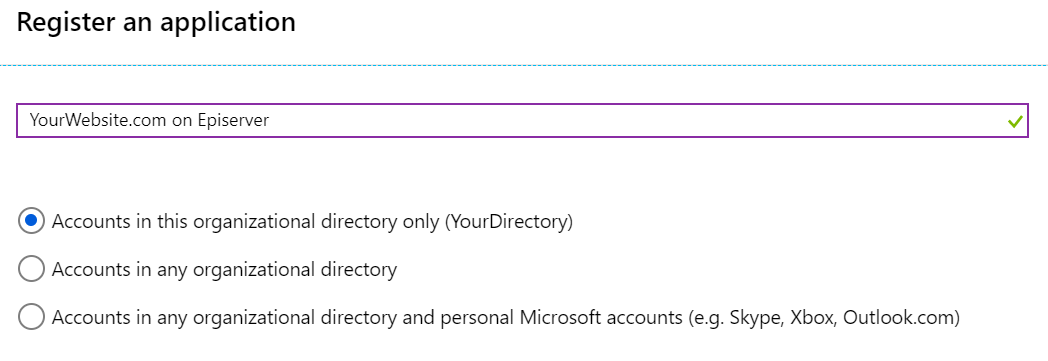
I selected to only allow accounts in my organization's directory to use the application. This will grant both members of your directory as well as guests basic ability to authenticate with the application, but it will not grant them any permissions to Episerver's edit or admin mode just yet.
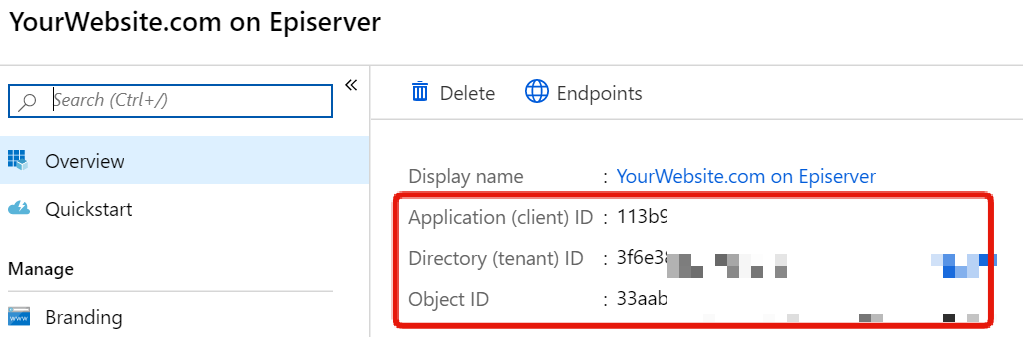
After creation, you should see a page that looks like this containing information you'll need for the configuration in code coming up:
Configuring OIDC
For this post, I'm assuming you already have an Episerver application that uses ASP.NET Identity. If you are not using Identity with Episerver yet, see Episerver's blog post on disabling the membership providers and leveraging ASP.NET Identity with OWIN. You will only need to execute the top three steps on:
$1
$1
$1
$1
When working with Azure AD, or just about any other authentication-as-a-service provider, you can OIDC (OpenID Connect) libraries to handle communication between your source of authentication and your application. Install the following NuGet packages:
$1
$1
$1
$1
$1
In your Authentication Config (OwinStartup)
This file can be named a few things, but it refers to which file that Owin will execute a method on to configure auth. If you can't find this file, search for:
- $1
<add key="owin:appStartup" value="CommerceSite.Web.Business.AuthenticationStartup" />
or
- $1
If you followed Episerver's post on setting up Identity, you'll find it's a class called "Startup". In that class, you should see something that looks similar to:
public void Configuration(IAppBuilder app)
{
   app.AddCmsAspNetIdentity<ApplicationUser>();

   app.UseCookieAuthentication( ... something ... );
}
You'll need to modify this Configuration method to be similar to:
public void Configuration(IAppBuilder app)
{
    app.AddCmsAspNetIdentity<ApplicationUser>();

    app.SetDefaultSignInAsAuthenticationType(CookieAuthenticationDefaults.AuthenticationType);

    app.UseCookieAuthentication(new CookieAuthenticationOptions());

    var clientId = ConfigurationManager.AppSettings["AzureAD:ClientId"];
    var tenant = ConfigurationManager.AppSettings["AzureAD:Tenant"];
    var redirectUri = ConfigurationManager.AppSettings["AzureAD:RedirectUri"];

    app.UseOpenIdConnectAuthentication(new OpenIdConnectAuthenticationOptions
    {
        ClientId = clientId,
        Authority = tenant,

        TokenValidationParameters = new TokenValidationParameters
        {
            ValidateIssuer = false,
            RoleClaimType = ClaimTypes.Role
        },

        Notifications = new OpenIdConnectAuthenticationNotifications
        {
            RedirectToIdentityProvider = context =>
            {
                context.ProtocolMessage.RedirectUri = context.Request.Uri.GetLeftPart(UriPartial.Authority) + redirectUri;

                if (context.OwinContext.Response.StatusCode == 401 && context.OwinContext.Authentication.User.Identity.IsAuthenticated)
                {
                    context.OwinContext.Response.StatusCode = 403;
                    context.HandleResponse();
                }

                return Task.FromResult(0);
            },
            AuthenticationFailed = context => {
                context.HandleResponse();
                context.Response.Redirect("/?Error=" + context.Exception.Message);

                return Task.FromResult(0);
            },
            SecurityTokenValidated = (ctx) =>
            {
                var redirectLoc = new Uri(ctx.AuthenticationTicket.Properties.RedirectUri, UriKind.RelativeOrAbsolute);

                if (redirectLoc.IsAbsoluteUri)
                {
                    ctx.AuthenticationTicket.Properties.RedirectUri = redirectLoc.PathAndQuery;
                }

                ServiceLocator.Current.GetInstance<ISynchronizingUserService>().SynchronizeAsync(ctx.AuthenticationTicket.Identity);

                return Task.FromResult(0);
            }
        },
    });

    app.UseStageMarker(PipelineStage.Authenticate);

}
Now that's a bit of code, but here's what it's doing for you:
Configuring OIDC authentication with app settings for: -- Client ID (Application ID) -- Tenant -- A Redirect Uri (relative path)
Handling for redirection to Azure AD with support for multi-site or multi-domain
Synchronizing Roles back to Episerver via Episerver's ISynchronizingUserService
Now, in your application settings, add:
<add key="AzureAD:ClientID" value="<your client id from step 1 of creating your azure ad application>" />
<add key="AzureAD:Tenant" value="https://login.microsoftonline.com/<your azure tenant id>" />
<add key="AzureAD:RedirectUri" value="/callback" />
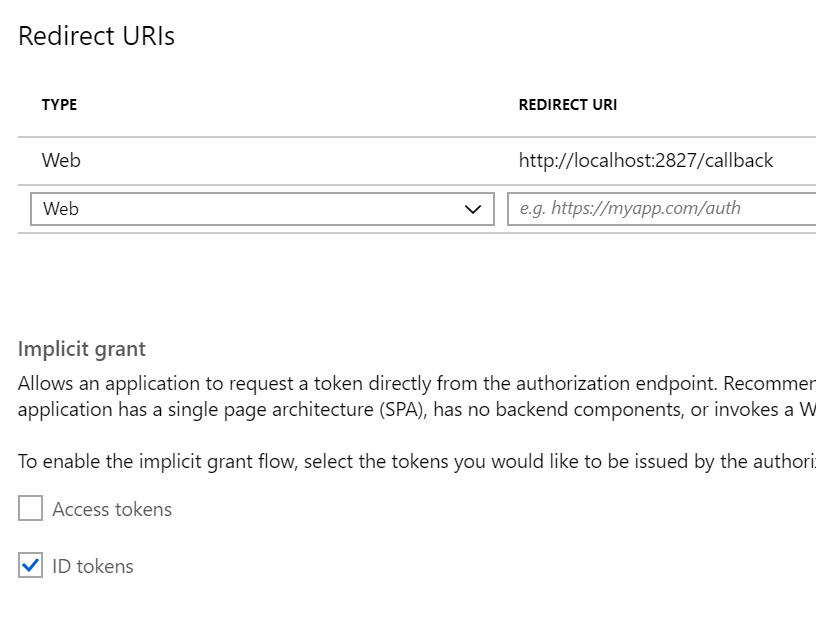
With any luck, you should be able to just run your project right away with these settings. For a test, visit /episerver and try to access the Episerver CMS interface and see if you are redirected to Microsoft's login page. If you get an error, don't worry, you likely need to update a couple settings. On your Azure AD Application's "Authentication" tab, add your site's URL (with /callback, or your redirect URI from app settings) and enable "id token".
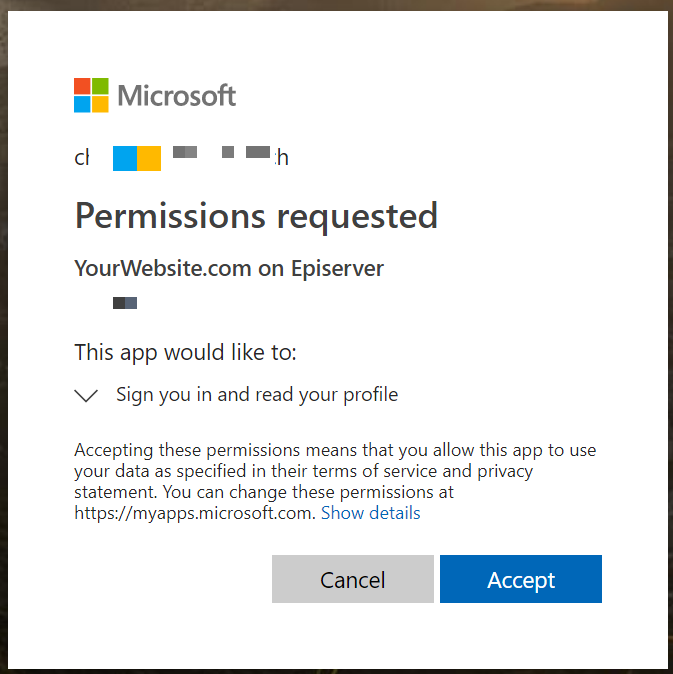
Try hitting /episerver on your application again. You should successfully see your login configuration:
Once you accept, don't worry if you see this message:
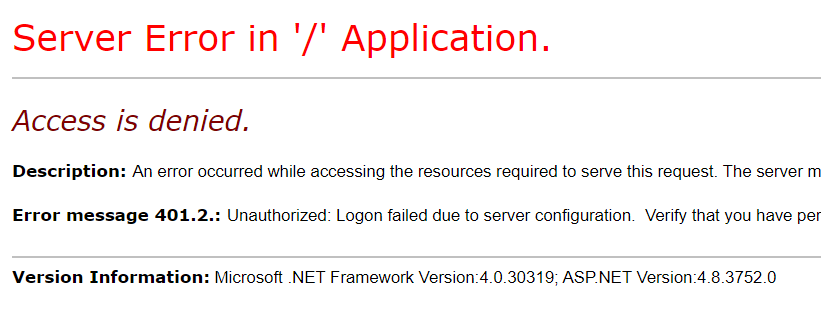
It's expected! At this point, you've:
$1
$1
$1
If you had been trying to access a page/section of your application that only required that you were logged in (no specific roles) you would see the page! If you want to do this, you can check out the next section on securing your entire website behind AD authentication without a specific role. Otherwise, skip to Securing Episerver UI.
Intranets / Internal Portals
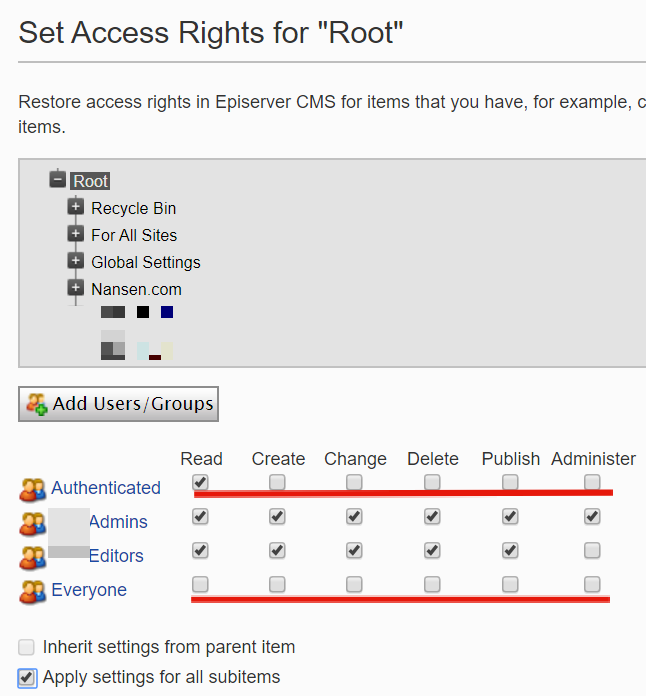
If working on an intranet/internal portal, you could use Episerver's Access Rights dialog (once you have access to the CMS) to set that "Everyone" does not have permissions to read content and grant the "Authenticated" role access to Read all content. Here's what that may look like:
Securing Episerver UI
If you would like to secure your Episerver CMS Editing and Administration interfaces with Azure AD, you're in luck because that's our next step. There is nearly unlimited ways to configure this, but we'll take a look at the most common two options:
$1
$1
Allow all users in Active Directory to access Episerver
I'd recommend doing this via virtual roles as long as you are not providing a method of authentication other than Azure AD throughout your application. In your configuration element for <episerver.framework>, find the element. With a fresh installation, you may see something like this:
<virtualRoles addClaims="true">
        <providers>
            <add name="Administrators" type="EPiServer.Security.WindowsAdministratorsRole, EPiServer.Framework" />
            <add name="Everyone" type="EPiServer.Security.EveryoneRole, EPiServer.Framework" />
            <add name="Authenticated" type="EPiServer.Security.AuthenticatedRole, EPiServer.Framework" />
            <add name="Anonymous" type="EPiServer.Security.AnonymousRole, EPiServer.Framework" />
            <add name="CmsAdmins" type="EPiServer.Security.MappedRole, EPiServer.Framework" roles="WebAdmins, Administrators" mode="Any" />
            <add name="CmsEditors" type="EPiServer.Security.MappedRole, EPiServer.Framework" roles="WebEditors" mode="Any" />
            <add name="Creator" type="EPiServer.Security.CreatorRole, EPiServer" />
        </providers>
    </virtualRoles>
modify that section, we'll just change the CmsAdmins and CmsEditors to use the other virtual role, "Authenticated".
<add name="CmsAdmins" type="EPiServer.Security.MappedRole, EPiServer.Framework" roles="Authenticated" mode="Any" />
<add name="CmsEditors" type="EPiServer.Security.MappedRole, EPiServer.Framework" roles="Authenticated" mode="Any" />
now you're all set, you should be able to access Episerver's CMS and Admin areas as any authenticated user in your AD. If you run into issues, ensure your and nodes in your web.config still have access for CmsAdmin/CmsEditors:
<location path="EPiServer">
    <system.web>
        <authorization>
            <allow roles="CmsAdmins, CmsEditors" />
            <deny users="*" />
        </authorization>
    </system.web>
</location>
<location path="EPiServer/CMS/admin">
    <system.web>
        <authorization>
            <allow roles="CmsAdmins, CmsEditors" />
            <deny users="*" />
        </authorization>
    </system.web>
</location>
Allow specific users/groups in Active Directory to access Episerver roles
So, let's pretend you want to secure your Episerver CMS UI with a special security group. There's advantages of this, mainly not having to manage access rights in the CMS and allowing your organization's existing IT processes to handle control of access to properties.
To start, we'll make some new application-specific roles in your Azure AD application. There is not, at the time of writing this post, a GUI interface for this, so you'll need to use the "Manifest" tab of your azure ad application, seen here:
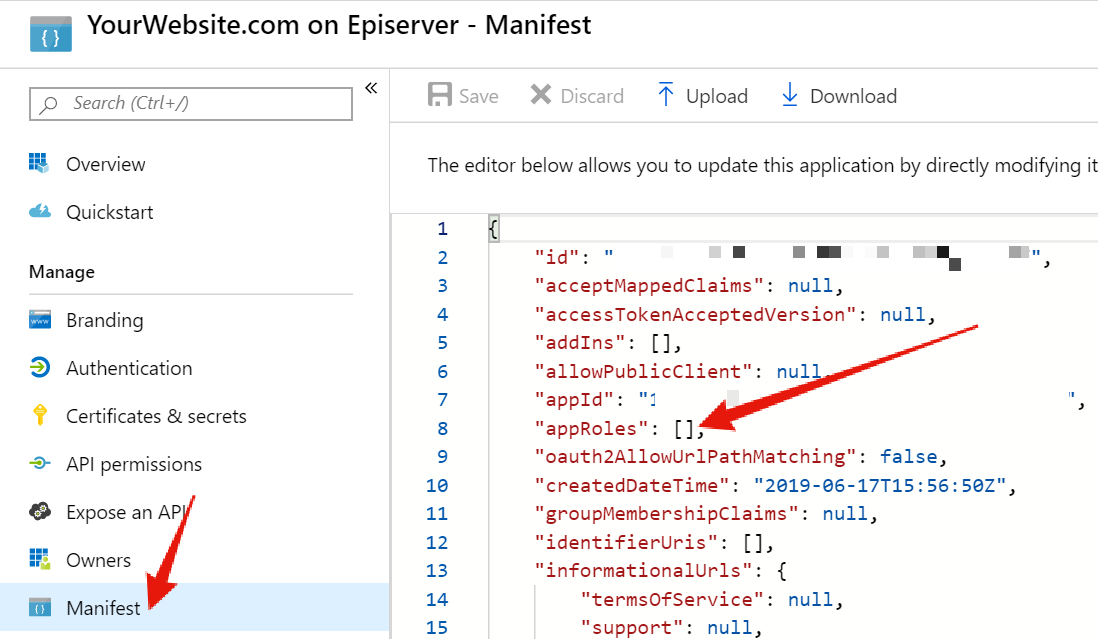
In the manifest, you'll see the "appRoles" section is empty. We'll just be adding a json-respresentation for a role there: (Replace the generic GUIDs with a new generated GUID)
"appRoles": [
    {
        "allowedMemberTypes": [
            "User"
        ],
        "description": "CMS Editor with access to Episerver UI",
        "displayName": "SiteEditors",
        "id": "00000000-0000-0000-0000-000000000001",
        "isEnabled": true,
        "value": "SiteEditors"
    },
    {
        "allowedMemberTypes": [
            "User"
        ],
        "description": "CMS Admin with access to Episerver UI",
        "displayName": "SiteAdmins",
        "id": "00000000-0000-0000-0000-000000000002",
        "isEnabled": true,
        "value": "SiteAdmins"
    }
]
This will create two roles that you can assign individual users or entire AD security groups (limited to paid Azure AD tiers) to via the Azure Portal:

Once that's complete and you log out/back into your application, you should have your synchronized roles for "SiteAdmins" or "SiteEditors". You would just need to modify your web.config virtual roles once more to pull your "CmsAdmin" and "CmsEditors" roles from the new AD roles (SiteAdmins and SiteEditors) instead of the "Authenticated" virtual role for all logged in users:
<add name="CmsAdmins" type="EPiServer.Security.MappedRole, EPiServer.Framework" roles="SiteAdmins" mode="Any" />
<add name="CmsEditors" type="EPiServer.Security.MappedRole, EPiServer.Framework" roles="SiteAdmins, SiteEditors" mode="Any" />
Wrapping Up
Azure AD is a no-brainer because of the ease of access control it provides to your application. It can be configured in almost endless different ways to provide you detailed access control both in and outside of Episerver.
Find this helpful? Find a bug? Need help with your own Azure AD or Azure B2C providers or any other kind of managed identity provider? Leave a comment or email me with the contact information on the right. Thanks for reading!
If you found this post helpful, please share it!